Wednesday 28 March 2012

My Completed Scenery

This is three different views from my draft renders of the scene. This is using the standard draft rendering and with the standard sunlight and skylight settings applied, with the times and date as mentioned before. The render shots show the different views of the scenery and the objects contained within them. I may adjust the lighting more slightly as I'm not 100% happy with the shadows and how the buildings look less detailed with different tones, as well as the texture of the floor appearing virtually non-existant.

Lighting Decisions

For the lighting in my scene, I have been using the Daylight System that we learnt about when starting to use Metal Ray Rendering. I have chosen to use the daylight system to make the lighting in the scene look as realistic as possible, and also because the country can be selected, as well as the month, year and time of day. I have selected Venice, Italy as my location purely because it is the closest city on the map to Florence, Italy, where my scene is set. I have chosen 08/08/2011 as my date and 13:30 as my time, when the sun should be at a high point.

The compass and the light have been moved so that maximum light is available for my scene. The light source is virtually directly above the city due to the time of day, and it is aiming inwards, so that the lighting will be behind the camera, which is one of the main rules when photographing and filming locations. This will be the right angle for virtually all of my camera shots.

This is the resulting render from using the daylight system, but with metal ray sunlights and skylights chosen. A sky has been added into the background as well as a floor for the surrounding area, but I am still unsure if the render for this particular setting shows the right tones and enough detail. I prefer what it looks like before the render more so than the render itself.

Using the standard sunlight and skylight settings produces the above render result. The tones and textures of the buildings are a lot closer to the original than the metal ray rendering, so it is more likely that I will be using this instead. The shadows may need to be adjusted slightly so that they are not quite so intense, but this render definitely is more of the result that I am looking for.

Assembly

I have been using the Group > Assembly > Assemble tool to group objects together. I have started on the floor, so that, if needed, the floor can simply be moved away in order to edit other parts of the scene. I am also applying this to the buildings, the tank and the barrels. The good thing with this tool is that parts can also be disasembled, which will be needed during some parts of the animating. It would have been preferable to start doing this earlier before all of my elements were merged into the same scene, but as I've only just discovered this tool, I will try my best to apply it correctly now.

Inserting Other Models Into The Scene

Now that the scenery for the town has been completed, I have begun to merge my existing models into the scene. The amount of polys is now around 520, 000 and the number of verts around 380, 000, so moving objects and generally viewing the scene is taking longer as things are slow loading up and generally editing, so time management may be more of an issue now more so than before, due to software limitations.
One problem I have found when merging existing models into a scene is that the textures can sometimes be a problem. As in the screenshot above, I have inserted the barrels that I have made into the scene with textures already applied, yet they do not appear to be there. They appear when I am rendering the scene, but if I decide that I need to change one slightly, I cannot do so without the materials being present in the material editor. Also, as rendering is now taking a few minutes for the scene rather than a few seconds, it is more time efficient that I can actually see the materials on my objects, rather than having to render each time to see the effects.

The tank has now also been merged into the scene, but with no problems viewing the materials on the tank this time, unlike with the barrels. I have been using the orphographic wireframe view to ensure that all of the objects in the scene, including the buildings, are all on the right level, so that things dont sink through the floor while I am animating. Making use of all of the different viewpoints has made positioning and alignment a lot easier, especially using the wireframe, while the perspective view without wireframe shows what my models look like in their entirity.

Monday 26 March 2012

Problem Solving

Now that my scenery has progressed and I have begun to merge all of my models together and increase the detail of them, my home laptop has decided that it can no longer cope. While doing some work, the program decided to crash (2011 32-bit version) due to the amount of polys etc. that are now being used. So now I am slightly more limited in where I can do my work, and even some of the computers in the labs are going slower than usual. Because of this, I am saving at least a week at the end of the semester for rendering my final animation, and am going to ensure that I get the majority of the modelling and animating done by the end of the easter break, then do all of the blogging after. This way, hopefully any further problems that I encounter, due to the program not being able to cope/crashing and losing some of my work, will be rectified. I will also ensure from now on to back up every single time that something gets changed, and to keep multiple back-ups of my work incase one of them becomes corrupted.

Wednesday 21 March 2012

More Buildings

Constructing my scene so far is going well. I have noticed the program getting slower, so am expecting to encounter some crashing in the near future, maybe due to the amount of polys and vertexes that are now being used, from the detail on all the buildings and the background combined. Although I have only been cloning and re-arranging the set of the buildings that I have recently developed, the scene I feel is still looking quite impressive and what I planned it out in my storyboard and other sketches to look like. I will continue to develop this further by adjusting the lighting, importing other features into the scene and possibly adding some other features to the street if I deem that necessary later on (I will look at some more pictures of streets in Venice from the 15th century to see what things there normally were).

Adding The Background

I have now begun to make the background for my scenery. As Florence is a busy town with lots of buildings and I do not have the time to make a whole town, I am going to place bitmap images onto a box shape, then adjust where they need to be positioned according to the angle of the camera. As long as three of the angles are covered, then this should hopefully work out.

The first problem that I encountered was when finding the images to be used: the images weren't of a substantial size for my original box for the background. As a result of this, the background was made slightly smaller, but still big enough, to accomodate the sizes of the images that I was using and to prevent them from being blurred. They were then cloned, with the image being mirrored so that it all looks like one big background. When testing out the camera, if needed, I will add on some extra sky using Photoshop, but hopefully this won't be an issue. The lighting will also need to be adjusted accordingly so that it looks like daytime, but as we have already done this when using metal ray rendering, it shouldn't be too much of a problem.

Floor Texturing

For the texture of the ground for my scenery, I have used a stone/rock texture, that has been applied to a box shape and cloned many times to cover the area that I need. I have cloned it lots rather than using one big plain as when I first did this, even when applying UVW Mapping, the floor still looked blurred and the texture quality was poor. This way, it looks more realistic. However, I have had to be very precise when aligning all of the pieces together to prevent overlapping.

Tuesday 20 March 2012

Textures

Have found a very good site for the kind of textures that could be used in my animation. Some of them are similar to the style that I am using and would fit in very well with scenery of the time era that I am looking at.

For my own reference, in case I lose the link:

http://www.mb3d.co.uk/mb3d/maxTextures_Home_-_Free_Seamless_and_Tileable_High_Res_Textures.html

SWOT Analysis

SWOT Analysis of my work so far:


Strengths
  • Can stick to deadlines and am keeping good progress so far.
  • When work needs to be done, I will do it and sacrifice other things to do so.
  • Bit of a perfectionist.
  • Keen eye for detail.
  • Have some good models so far as a good basis for the animation.
  • I am enthusiastic about 3D animation and am enjoying it immensely, which makes the work a lot easier.
  • Am now familiar with 3DS Max's interface and with many of the tools used.
  • Good mark from the first part of the assignment, which I am very pleased with!

Weaknesses
  • Tend to focus on one particular module above others (good for this module but not so good for keeping the workflow up to date with the others - it'll catch up with me eventually).
  • Have used 3D Max so far mainly for modelling, so not as confident with animation.
  • Only animation that I have done so far has been 2D and in Flash.
  • Pressure to keep up with the high grade from the first assignment so that I can still keep an A grade.
  • Rendering time will be longer for animating, so need to leave some extra time at the end to allow for this.

Opportunities
  • Learning how to use a program that is used in the industry to create 3D models and animation.
  • Have learnt a variety of modelling, animation, design and texturing techniques: covering a wide area for future career choices and having all of this available to show at potential job opportunities.
  • Am now familiar with the 3DS Max interface.
  • Growth in confidence with creating 3D - especially with modelling.
  • A program that I enjoy using.
  • A new possible career, as I feel that I am good at 3D modelling and really enjoy it.

Threats
  • The job market: when coming out of uni will there be many jobs relating to 3D available?
  • Stress from work overload.
  • All of my back-ups somehow being destroyed.
  • The program crashing and losing some of my work.
  • Not keeping up to date with everything.

First Finished Set of Buildings

Front View

Rear View
The screenshots above show the completed buildings for one side of the street where my animation is going to take place. Upon viewing the screenshots, I am debating whether to make the gap between some of the buildings slightly smaller, in case it proves a problem later on when the tank is viewing around and seeing the rest of the scenery. For the other side of the street and at one end of the street (as the animation will only be shot from one end, there will be no need to include buildings at the other end too) I will be cloning the buildings and re-arranging them, so that I don't have to spend more time modelling, but the re-arrangement is so that it isn't completely obvious to the audience that the buildings have been cloned.

Further Progression of Modelling

I have been pushing on with making my buildings for the road where my animation is going to take place. I have been making another building today, using mainly elements from the first building, but by adjusting the textures and the colouring slightly. The screenshot above shows where I have had to include more polygons in the top part of the building, so that I can correct a part where a section is sticking out. The sticking out part suited the alignment of the first building, but as the lower part has slightly different dimensions in this building, this part needs to be adjusted accordingly.
Another problem that I encountered today was in the material editor. All of the locations of the bitmaps for my materials could not be found, so I had to re-locate all of these for the main bitmap and for the bump bitmap, so that all of the materials look the same as before.

As I don't want the windows to all look too similar, I have been changing little features of them for the last couple of buildings that I have been making. The top part has changed colours slightly, and for the smaller windows, the edging has had a brick texture applied. For some windows that will be on the side of the latest tall building, the shape has been changed and the image used has needed to be adjusted so that the quality of the bitmap itself is not impacted by the framing adjustments. However, I am using the same bitmap images for the windows and doors that were used in the original model, to ensure consistency throughout the buildings, as the majority of the buildings in this time era and especially in the same area had very similar doors and windows.

My next task has been too adjust the brickwork so that all the different boxes and other shapes that I have made are consistent with each other in terms of textures. As some of the brickwork has been coming up slightly different sizes, I have made note of the exact measurements of length, width and height and am inputting the numbers to the needed sections, using the UVW Mapping tool. The majority of the mapping has been using box mapping, but certain parts have required the alignment to be changed. Although this detail may not be the most noticeable thing during the animation, I would prefer it all to be correct to make the animation seem more realistic.

For the brickwork on some of the roofs, UVW Mapping has once again been applied, but the parameters have been changed so that there is no distorting the image. Also, Cylindrical Mapping has been used so that the brickwork is in the right position, rather than all of the bricks simply going in the same direction. I may look for some more slightly varied brick textures for the roofs, however, the problems that I found before were either that the angle the photo was taken was not efficient to create a texture from, of that the image was watermarked and required a payment to get the un-watermarked image. If this is the case again, I can edit the existing images that I have in Photoshop, just to vary the texture and colour settings slightly.

Reactor

Today, we have been using the reactor tool in our animation. The reactor tool is used to edit the mass, friction etc. so that when an object moves, these things are taken into account. Firstly, we simply made a box fall from a strange angle onto another flat box, which forms the surface. the objects needed to be grouped into a rigid body collection and the mass of the box needed to be adjusted. The gravity could also be adjusted if it was needed to be.

Next, we had a model of a bowling alley to animate. Firstly, the mass of the pins and the bowling ball needed to be adjusted appropriately: the pins had a mass only half of that of the bowling ball. We also needed to adjust the position of the ball in the first 5 keyframes so that it is rotated slightly to have the momentum to move down the alley. The Col. Tolerance also needed to be adjusted so that the pin wouldn't simply fly everywhere, so it was changed to 0.5, which was the lowest that it could go. Originally, I had the problem of one of the pins falling through the floor, but after adjusting where the pin was slightly, this problem was combatted. The pins and ball still fall off of the end of the alley, but only because of the length and width of the ground.

Wednesday 14 March 2012

Modelling The Scenery

I have now begun to model my scenery that will be needed for my animation. I have begun by adding on an extra building to the end, using the roof from one building, the windows from another and the brickwork from the third. Some UVW Mapping needed to be applied again to ensure that the bricks went the right way round, but apart from that and some alignment, not much has been needed to be done so far. I have also left a gap between the two buildings because some buildings in Italy have narrow gaps between buildings, to allow for shortcuts. This also adds some more variety to my models, rather than having them all terraced and joined up.

Progression of Town

For the scenery in my animation, I am needing to expand on my model of three buildings. The sketch above shows the rough plan that I am going to use to make the rest of these buildings. All of the buildings are going to have very similar brickwork and features, as many of the buildings from this time period were very similar. However, to be more creative than simply cloning the three buildings that I have already made, I am going to use features (e.g. windows, shapes etc.) and mix and match them together to make a set of new connecting buildings. I aim to have them look similar to the sketch above, then this set will be cloned/rotated/shifted around slightly for the other side of the street in which my production will take place. I will then use some more of these buildings, if needed, for the background of my animation, depending on how the camera looks. I will also find a decent texture to use for the brickwork on the floor, and a photo or two for the background.

Tuesday 13 March 2012

Morpher


Today, we learnt how to use the morpher tool. Starting off, we had a model of a basic human head, which was then converted into an additional poly and cloned (as a copy) three more times. Using the polygon selector, the bottom part of the mouth was selected. Then, using the grow tool in the editable poly menu, the rest of the lower jaw was selected. This could then be moved to make the mouth more open. I renamed each of the heads according to what was going to affect them, which was an open mouth, closed eyes and raised brows. Once all of these had been edited, the morpher tool was then applied. This was firstly applied to the original head, with the slots being filled with the other heads and how much was adjusted.


This was then smoothed using the turbo smooth, to make it look more shaped like a head, and then the auto key was enabled to begin animating. The only problem with animating is that on the timeline, we cannot see which feature is being animated, as all of the keys are the same colour. To combat this, the curve editor is opened and all of the different movements can be seen and adjusted seperately. For the animation, I made a short clip of 100 frames showing a person opening their eyes and mouth, then closing them again as they raise their brow - a bit like someone starting to wake up in the morning. To ensure that the animation is fluid, I made sure that all of the movement settings on the first and last frame of the animation were exactly the same.

Tuesday 6 March 2012

Animation Storyboard


This is the storyboard for what I plan to make in my animation (excuse the poor quality). I am going for more of a comedy value in my short animation, but showing a variety of camera shots and techniques.

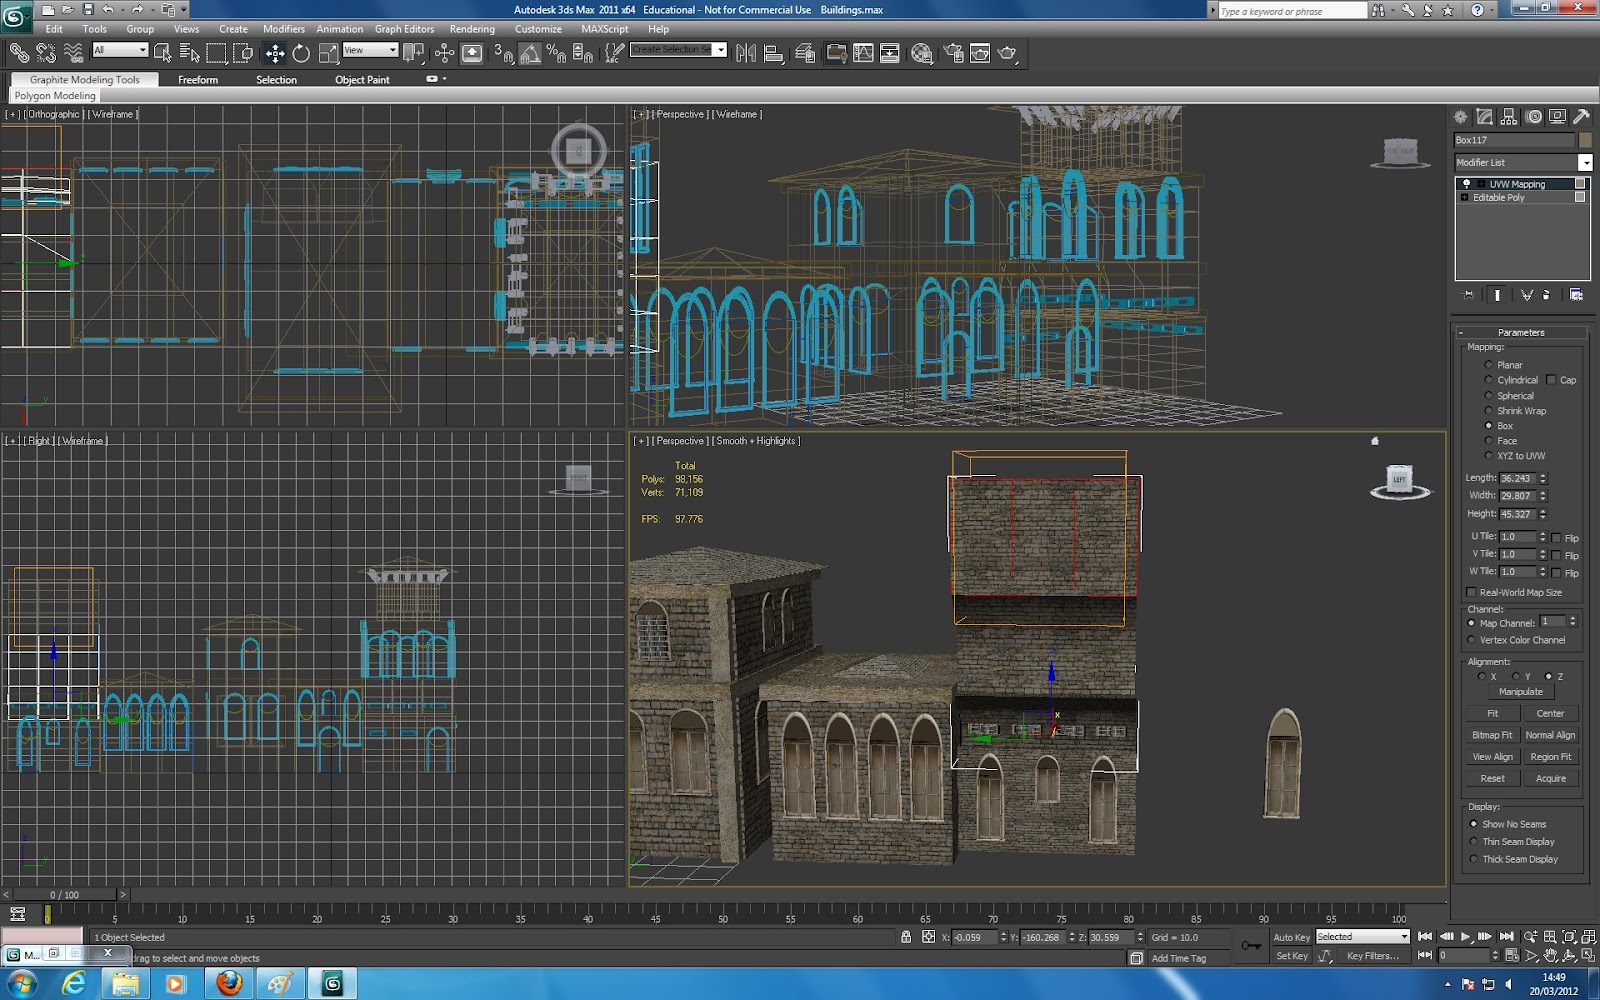
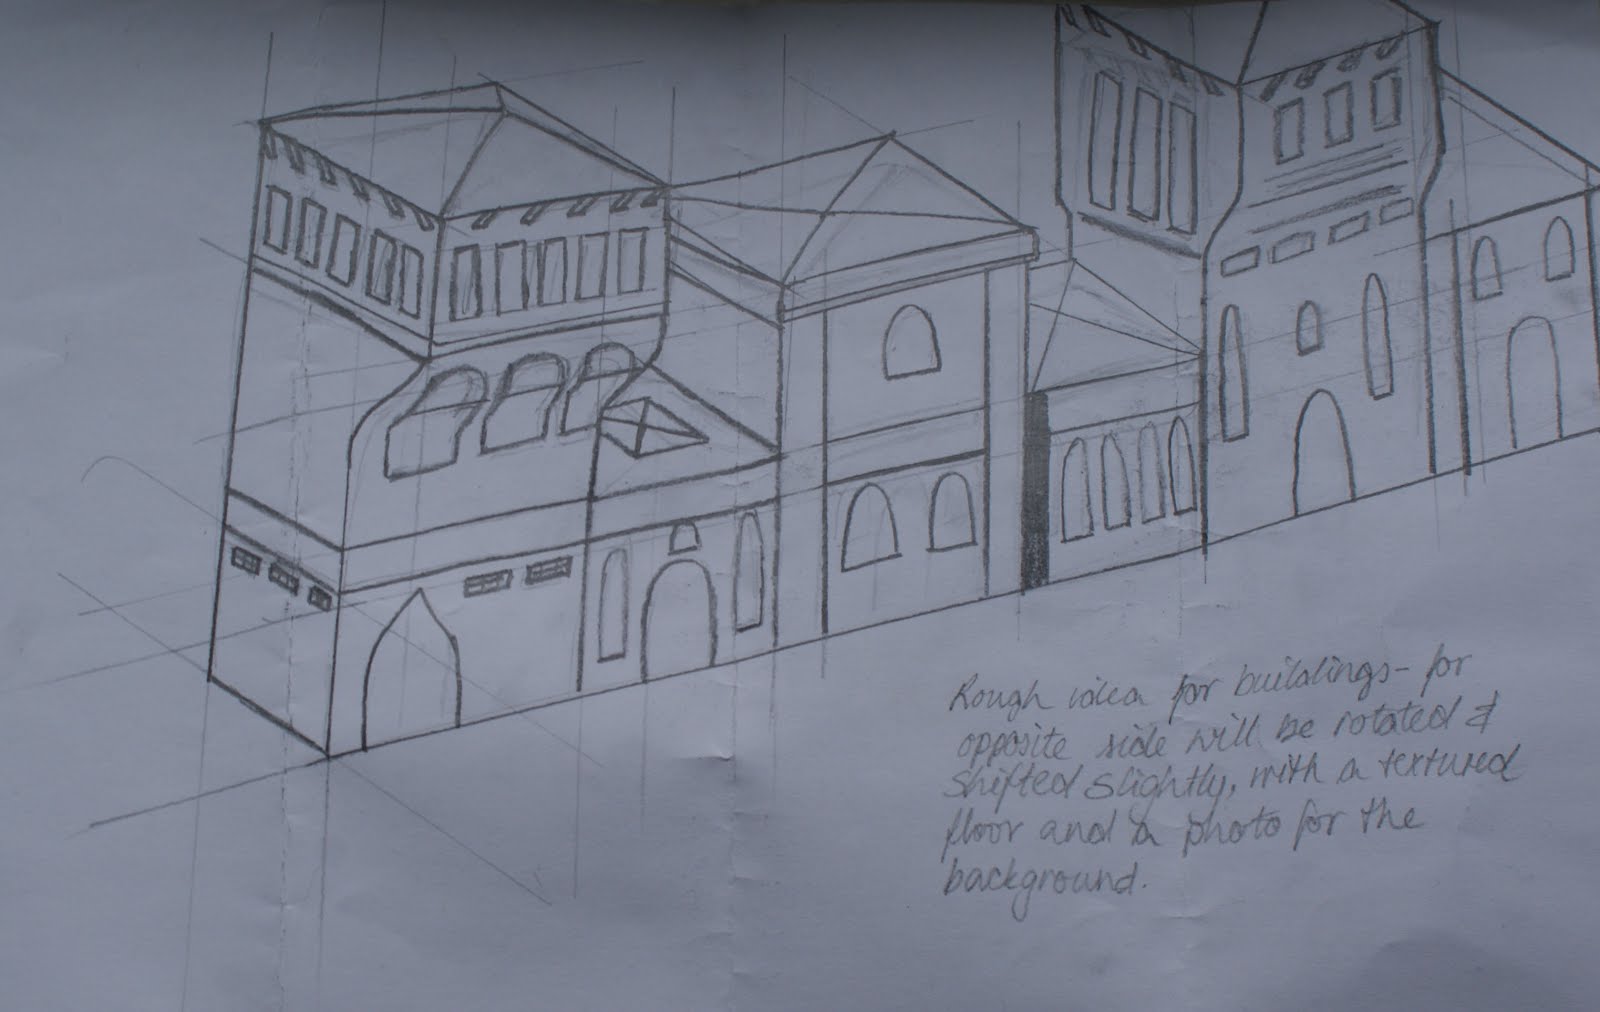
Panel 1 shows, quite simply, the model of my tank moving throughout the city, with the door, which starts off being open, closing as the tank moves. It will use a birds eye view and will gradually zoom in and rotate to show a side view of the tank, following it as it moves. The city itself I need to expand upon: as I have already created a small set of buildings, I can repeat these in certain parts of the city, however, to make it look more realistic, I am going to make more buildings. However, as it would take too long to make a complete city from scratch, I am going to use parts of the buildings that I have already created and mix certain features together to create new buildings. These buildings will be a part of my scenery throughout, so I need to ensure that there is a sufficient number of these modelled. This will be the part that I will start next, before the actual animation process, as well as finding a decent texture for the ground.
Panel 2 changes the camera angle to the front of the tank as it is moving throughout the city. The camera stops when the tank does, which is when the tank begins to shake. A gradual zoom-in occurs while this is happening, until smoke starts coming out of the peep hole.
Panel 3 uses a high angled shot, looking down at the tank as it begins to spin around out of control, on a pre-set path.
Panel 4 shows the tank eventually hitting the pile of barrels that contain gunpowder, so this shot is a close-up of the barrels and the tank is it hits them and knocks them over. One of the tanks is hit at an angle so that the cork falls out of it and gunpowder pours out over the street. As the tank moves away, a small flame is left near the barrels, that immediately starts to get bigger.
Panel 5 uses the target camera and path constraint technique that was learnt last week. This will make it appear as though the camera is inside the tank and the destruction being left by the tank will be seen from this viewpoint. As the camera goes round, the flame by the barrels is getting bigger.
Panel 6 goes back to using a high-angled shot with the tank spinning out of control on a set path again. The size of the flame by the barrels is still increasing and getting closer to the barrels. On the second loop around the path, the tank hits the barrels with more force, which causes them to explode in an expanding flash of white light expanding from the barrels. As the light spreads, the buildings are engulfed into it, while the tank flies into the air.
Panel 7 (the final panel) is the tank flying into the air, spinning as it goes, and getting closer to the camera. It eventually hits the camera and everything goes black, signalling the end of the animation.

I shall try and add appropriate music and sound effects for this animation to expand on the idea slightly, as I appreciate that it is fairly simple. But I am mainly focussing on getting the camera angles and techniques right rather than going for a longer and more detailed story, as this is my first animation. I have already begun to research in some 3DS Max books how to create the flames of the fire and will progress on to researching and practising the other techniques that will be needed to create this animation.

Thursday 1 March 2012

Evaluation

Over the past six weeks, I have learnt more than I thought was possible in a such a short amount of time about 3DS Max. I have learnt many techniques that have proved very useful when making my models and should be just as useful in future projects.
When this project begun, I wasn't at all confident in using 3DS Max, due to having no prior experience in using the program, but now I feel confident enough to model pretty much anything to a decent standard - as long as the time and effort is put in on my part. Now being familiar with the program interface and it's features, I look forward to creating some more models again, and would definitely consider being a character modeller as a career path. I have already been doing some additional reading and tutorials in my spare time to try and learn some more complicated techniques and other things that may be useful when modelling, especially for humans, as they are a popular choice of character in many games/movies, yet seem like one of the more difficult forms to create.
Overall, the models that I have achieved for this part of the model I am very happy with - especially the building, which I feel definitely has the look of a group of buildings from the 15th century. This is mainly due to the amount of pre-production research done to ensure the authenticity of the models made in the project and to make sure that they looked historically accurate. The other two models I am also very happy with - I have used many techniques to create them and feel that they work well for the project. However, if I was to do anything differently, if I had more time, I would have experimented with the lighting of the models, make the interior of the tank and create some more buildings to create a small market square. I may still make these improvements in my own time in the future, to get some more practise using the program. But, overall, I have enjoyed this part of the module immensely and would happily do it again in the future.